DIY Soft Wash Roof Cleaning: A Complete Guide to Doing It Safely
Those dark, grimy streaks on your roof are more than just an eyesore; they’re living organisms that can shorten the life of your shingles. You know they need to go, but tackling a diy soft wash roof cleaning project can feel intimidating. The thought of using high-pressure is concerning, and for good reason-it can cause serious, costly damage. Add in the confusion over chemical mixes and the safety risks of working on a ladder, and it’s easy to feel stuck. But what if you could get professional results safely and affordably?
This guide provides a complete, step-by-step plan to restore your roof’s appearance without the risk. We will cover the essential safety precautions, the correct chemical ratios for killing algae and moss, and how to protect your home and landscaping from runoff. By following these professional-grade instructions, you can confidently clean your roof, enhance your home’s curb appeal, and protect your investment for years to come.
Key Takeaways
- Understand the non-negotiable safety protocols-for yourself, your property, and nearby electrical lines-before attempting to work on any roof.
- Discover why low-pressure soft washing is the only method professionals trust to remove algae and stains without causing costly damage to your shingles.
- Get a complete roadmap for your diy soft wash roof cleaning project, from the correct chemical mix to the step-by-step application process.
- Learn to recognize the limits of DIY and when calling an experienced professional is the smarter, safer choice to protect your investment.
What is Soft Washing? Why It’s the Only Safe Way to Clean a Roof
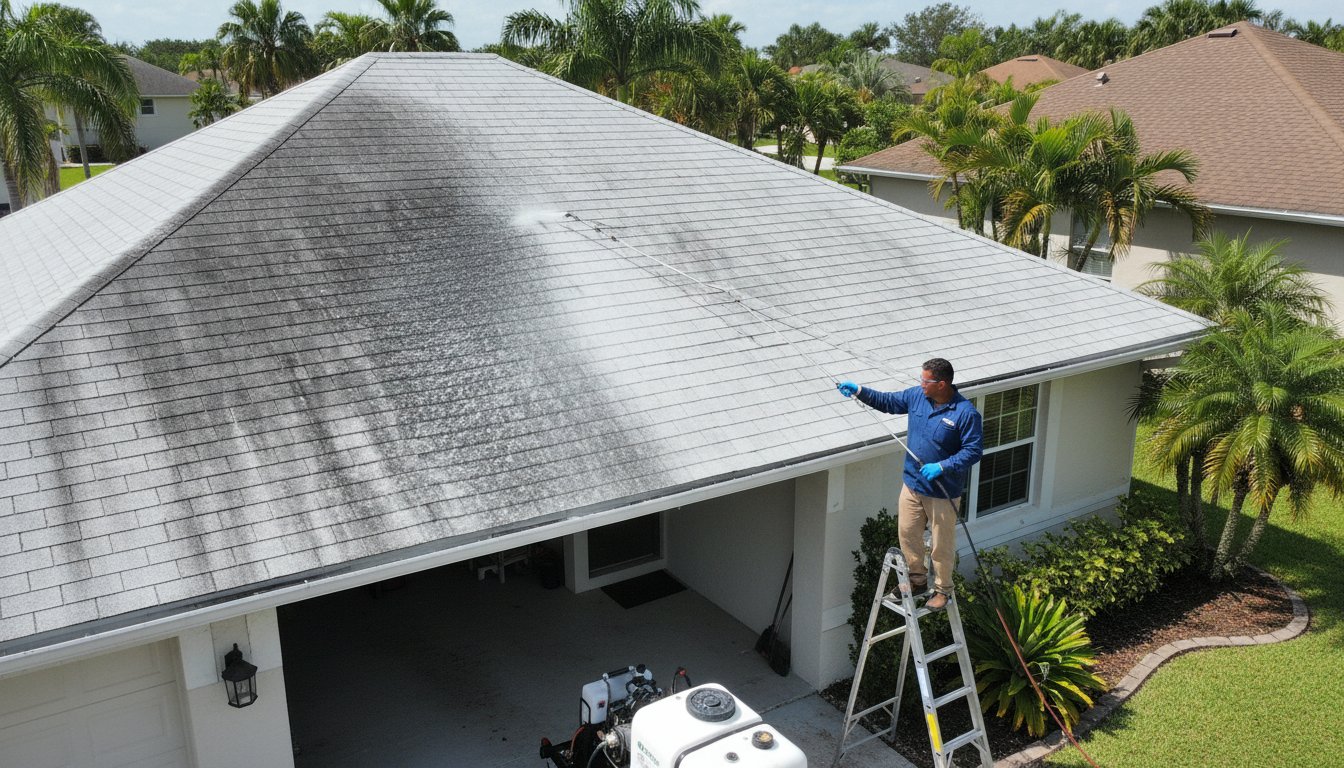
When you see dark, ugly streaks on your roof, your first instinct might be to blast them away. However, using high pressure is one of the most damaging things you can do to your shingles. The only method approved by the Asphalt Roofing Manufacturers Association (ARMA) is soft washing, a technique that prioritizes the health and longevity of your roof.
So, what is soft washing? It is a professional, low-pressure cleaning method that uses specialized, biodegradable cleaning solutions to safely remove organic growth like algae, moss, and lichen. The chemical solution does the hard work by killing the organisms at their root, allowing them to be gently rinsed away. It cleans your roof thoroughly without the destructive force of high pressure.
Soft Wash vs. Pressure Wash: The Critical Difference
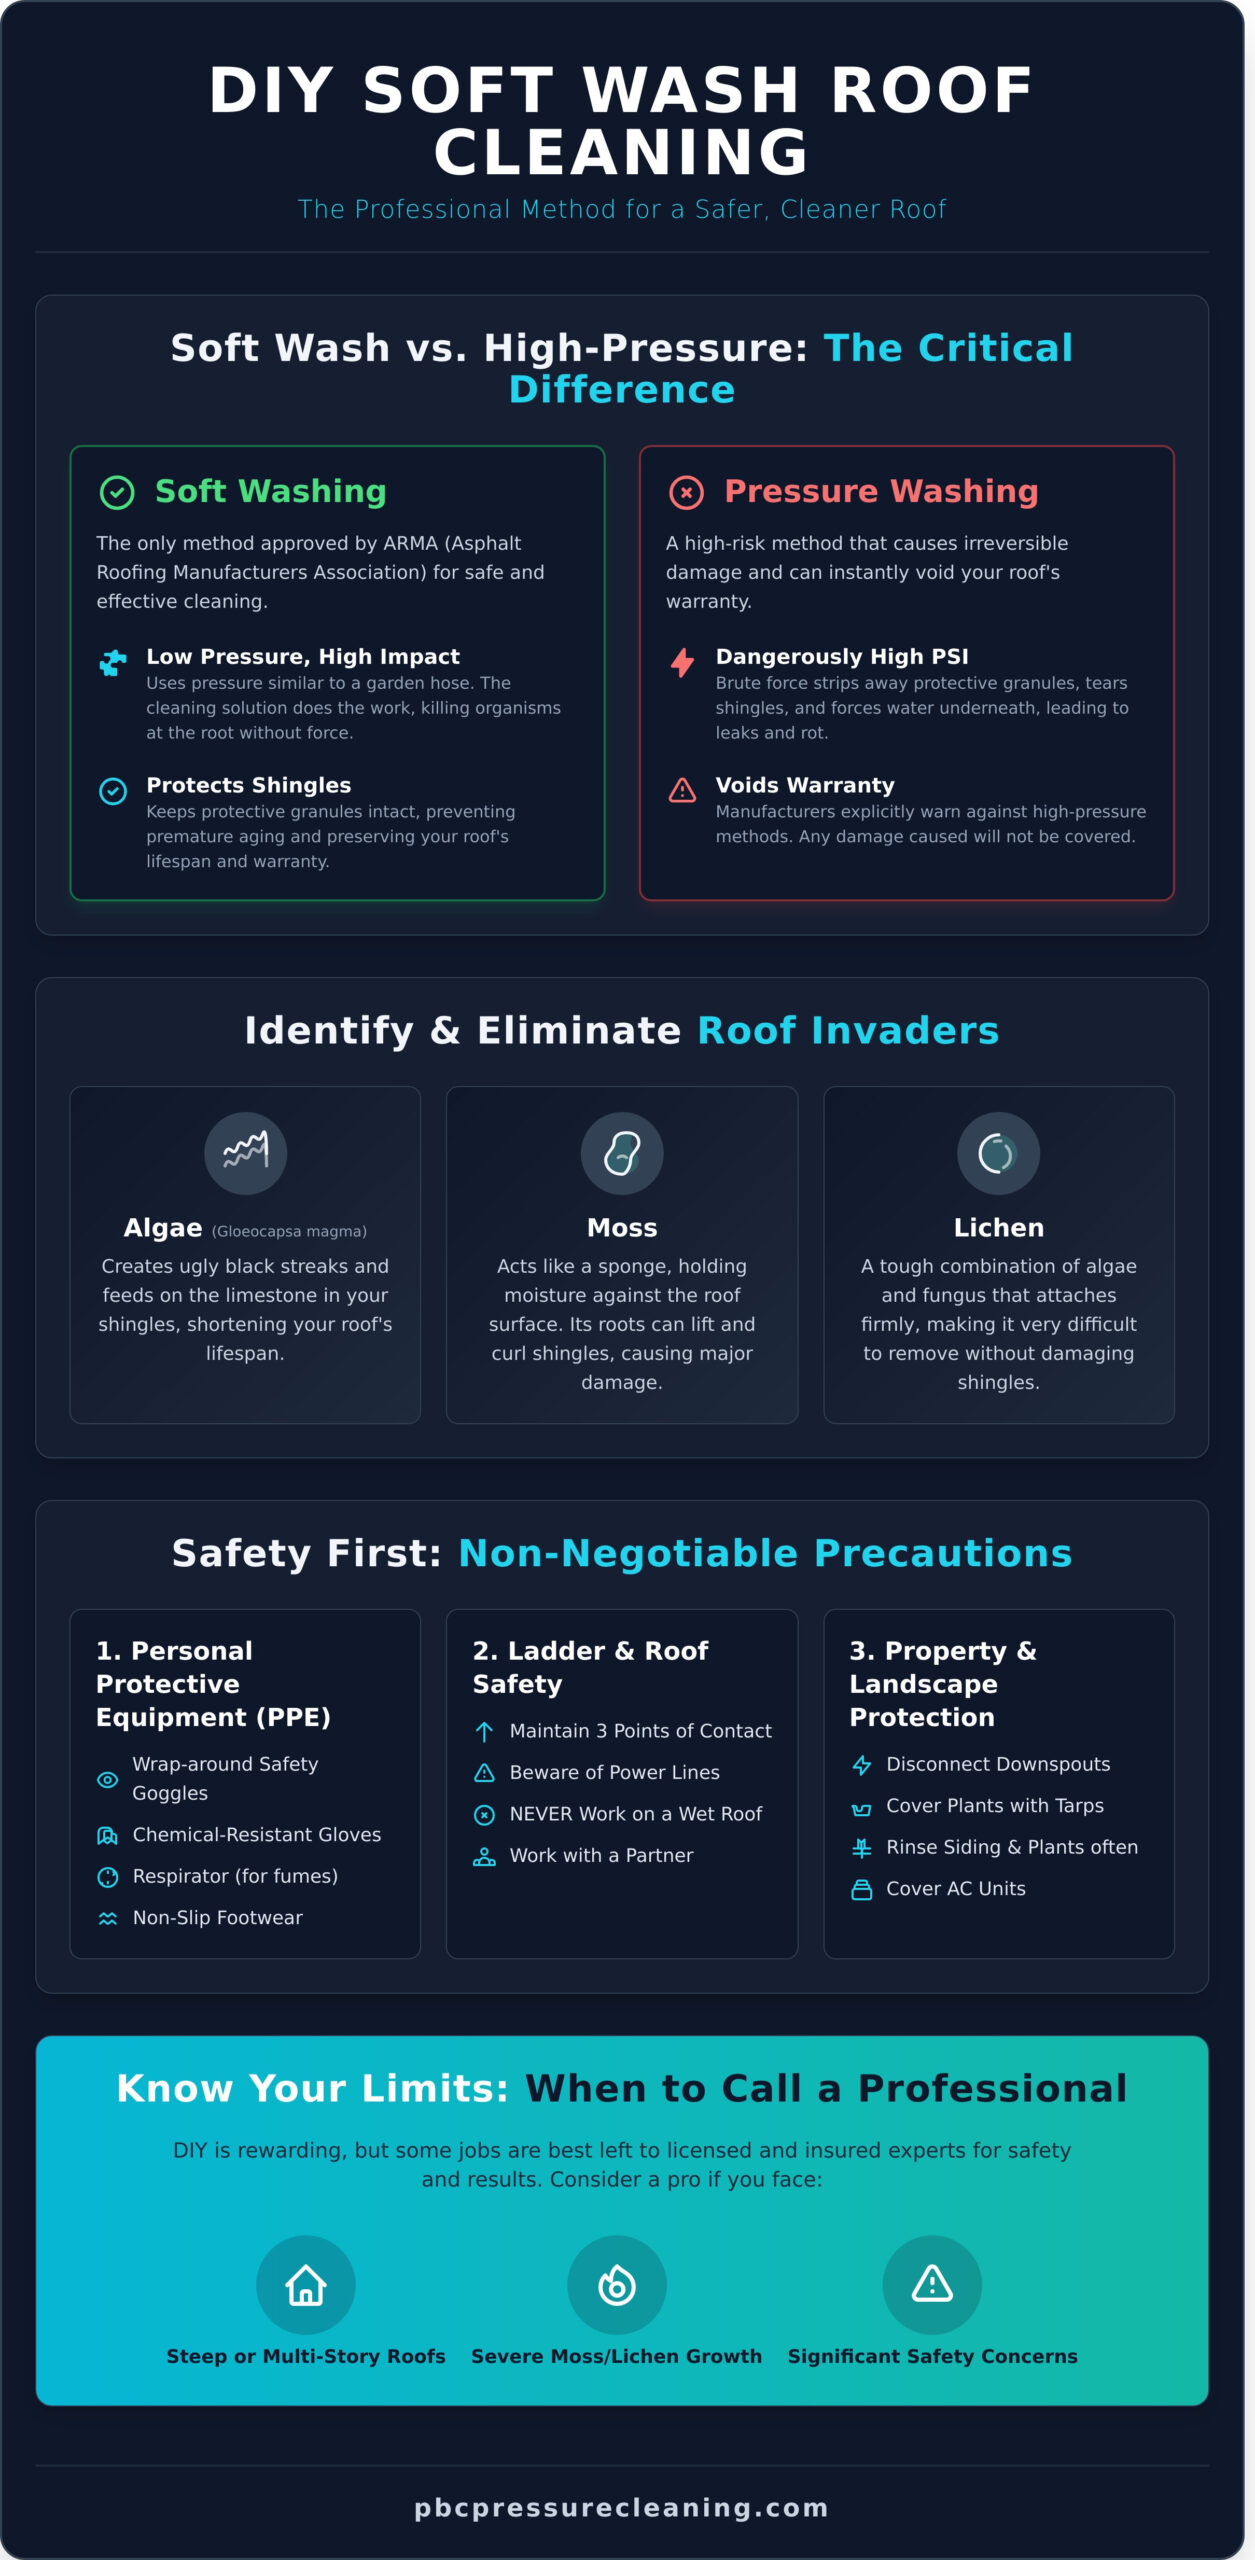
A pressure washer uses dangerously high PSI (pounds per square inch) to strip away surface grime. This brute-force approach rips the protective granules off your asphalt shingles, forces water underneath them, and can cause immediate leaks and long-term rot. This type of damage will almost certainly void your roof’s warranty. In contrast, soft washing uses a pressure similar to a garden hose, ensuring your roof is cleaned meticulously without causing harm. This critical distinction is why a professional service is a far safer choice than attempting a risky diy soft wash roof cleaning project without the right equipment and training.
Understanding the Stains: Algae, Moss, and Lichen
Those unsightly black streaks are not dirt or mildew. They are a hardy type of algae called Gloeocapsa magma. This organism thrives in humid climates and feeds on the limestone filler in your asphalt shingles, literally eating away at your roof and shortening its lifespan. What starts as a cosmetic issue quickly becomes a structural problem that compromises your home’s most important protective barrier.
Other culprits include:
- Moss: Holds significant moisture against the roof surface and has root-like structures that can lift and curl shingles.
- Lichen: A combination of algae and fungus, it attaches firmly and is very difficult to remove without damaging the shingle granules.
These organisms are not just stains; they are actively degrading your roof. A proper soft wash treatment is the only way to kill them completely and protect your property’s value.
Safety First: The Non-Negotiable Precautions for DIY Roof Cleaning
Before you gather your equipment for a diy soft wash roof cleaning, it is critical to understand that working on a roof is one of the most dangerous home maintenance tasks you can undertake. There is no substitute for caution. Professionals are licensed and insured for this work precisely because the risks of falls, chemical exposure, and property damage are significant. We strongly advise against ever working alone, on a wet roof, or in windy conditions where ladders can become unstable and cleaning solutions can drift unpredictably.
Meticulous preparation is essential to protect yourself, your property, and your landscaping from harm. A successful project requires a professional-grade focus on three key areas of safety.
Your Personal Protective Equipment (PPE) Checklist
The cleaning agents used in soft washing, particularly Sodium Hypochlorite, are caustic and can cause severe chemical burns to skin and irreversible damage to your eyes. Equipping yourself with the right PPE is not optional-it is mandatory for your protection. Your essential checklist should include:
- Mandatory: Non-slip, rubber-soled footwear; wrap-around safety goggles; and chemical-resistant gloves.
- Recommended: A respirator rated for chemical fumes and full-coverage clothing to protect your skin from overspray.
Ladder and Roof Safety Protocols
A fall from even a single-story roof can be catastrophic. Professionals operate under strict safety protocols, often guided by standards like OSHA’s fall protection requirements, and for good reason. Always inspect your ladder for stability before use and maintain three points of contact (two feet and one hand, or two hands and one foot) when climbing. Never stand on the top rungs. Once on the roof, be acutely aware of your surroundings, especially overhead power lines. Plan your application path to avoid walking on wet, slippery surfaces, as the combination of water, algae, and cleaning solution creates an extremely hazardous environment.
Protecting Your Home and Landscaping
A thorough diy soft wash roof cleaning protects your roof, but the chemical runoff can damage everything below it. The same solution that eliminates algae can kill your plants, stain your siding, and damage your air conditioning unit. To prevent costly damage, you must take these protective measures:
- Pre-saturate: Thoroughly rinse all plants, grass, siding, and decking with fresh water before, during, and after the chemical application. This dilutes any accidental overspray.
- Cover Up: Use heavy plastic sheeting to completely cover delicate flower beds, vegetable gardens, and outdoor electrical units like your AC condenser.
- Divert Runoff: Use bags or temporary extensions to divert gutter downspouts away from sensitive landscaping and into a safe drainage area.
The DIY Soft Wash Toolkit: Equipment and Cleaning Solution
Embarking on a diy soft wash roof cleaning project requires more than just a ladder and a garden hose. Assembling the correct equipment and mixing the cleaning solution properly are critical steps that determine both the safety and effectiveness of your work. Unlike professional services that use custom, truck-mounted systems, a DIY setup relies on accessible, consumer-grade tools. Here’s a thorough breakdown of what you will need to get the job done.
Essential Equipment You’ll Need
Having the right hardware is non-negotiable for both safety and results. You can source most of these items from major hardware stores or online suppliers. Your basic toolkit should include:
- A 12-Volt Pump Sprayer: This is the core of your system. It delivers the cleaning solution at low pressure, which is essential for a soft wash. While professionals use high-flow systems, a quality 12-volt chemical sprayer (often sold as a large-capacity “spot sprayer”) is the standard for DIY applications.
- Sturdy Extension Ladder: A ladder that can safely and securely reach your roofline is mandatory. Ensure it is rated for your weight and placed on stable, level ground before every use.
- Garden Hose & Nozzle: You’ll need a reliable water supply for rinsing the roof and surrounding vegetation. A nozzle that can produce a gentle spray is crucial to avoid damaging shingles.
- Safety & Mixing Gear: This includes multiple 5-gallon buckets for mixing your solution, safety cones to block off the work area, and full personal protective equipment (PPE)-goggles, gloves, and appropriate clothing.
The DIY Roof Cleaning Chemical Recipe
The active ingredient in most professional roof cleaning solutions is Sodium Hypochlorite (SH). This is the chemical found in household bleach and, in higher concentrations, pool shock. For effective roof cleaning, you will need a stronger concentration than standard laundry bleach.
EXTREME CAUTION: Sodium Hypochlorite is a hazardous chemical that can cause severe skin burns, eye damage, and harm to plants and property if mishandled. Always wear full PPE when mixing and applying.
Look for liquid pool shock with 10-12.5% Sodium Hypochlorite. A common starting mixture for a diy soft wash roof cleaning solution is a 50/50 blend of water and your 12.5% SH, which creates a final cleaning solution of approximately 6%.
The Importance of a Surfactant
A surfactant is a vital additive that helps your cleaning solution “stick” to the roof surface. Without it, your mix would quickly run off, especially on steeper pitches, preventing the SH from having enough dwell time to kill the algae and mildew. For homeowners looking for more eco-friendly options, consulting resources like the EPA’s Safer Choice program can help identify ingredients that are safer for your family and the environment. While some guides suggest a squirt of dish soap, professional-grade surfactants provide better cling and more predictable, suds-free results.
Step-by-Step Guide to Soft Washing Your Roof
If you’ve assessed the risks and are committed to tackling this project, a successful diy soft wash roof cleaning requires a meticulous and methodical approach. This process relies on the right chemical solution to eliminate grime, mildew, and algae, not high pressure. Patience is key; allow the cleaning agents to do the heavy lifting to avoid damaging your shingles and to achieve a thorough, lasting clean. Before you begin, always test your cleaning solution on a small, inconspicuous area of the roof to ensure it does not cause discoloration.
Step 1: Site Prep and Pre-Rinsing
Proper preparation is critical to protect your property and ensure your safety. Before any chemicals are mixed, you must prepare the entire area surrounding your home. This step prevents damage to your landscaping and creates a safe working environment.
- Clear the perimeter of your home, moving patio furniture, vehicles, potted plants, and children’s toys to a safe distance.
- Using a garden hose, thoroughly saturate all plants, shrubs, and grass near the foundation. Also, wet the sides of your house to dilute any accidental overspray.
- Place your ladder on stable, level ground. Ensure it is positioned securely and extends at least three feet above the roofline for safe access.
Step 2: Mixing and Applying the Solution
With the site prepared, you can now mix and apply the soft wash solution. Handle all chemicals with care, wearing appropriate personal protective equipment (PPE) like gloves and safety glasses. The goal is complete, even coverage.
- In a pump sprayer or bucket, carefully mix your sodium hypochlorite (SH), water, and surfactant according to the product manufacturer’s instructions.
- Begin applying the solution from the bottom of a roof section and work your way up. This prevents streaks from forming.
- Use smooth, even, overlapping strokes to ensure every shingle is coated. Never stand directly above the area you are spraying to avoid slipping on the wet, treated surface.
Step 3: Dwell Time and Rinsing
This is where the cleaning action happens. The solution needs time to work, but it must not be allowed to dry on the roof surface. During this phase, continue to protect your property from the cleaning agents.
- Let the solution dwell on the roof for 10-15 minutes. You should see the black streaks and green algae begin to disappear.
- While the solution dwells, lightly mist surrounding plants and siding with fresh water to keep them protected.
- Once the dwell time is complete, rinse the roof thoroughly with a standard garden hose, starting from the top and working your way down.
- Perform a final, generous rinse of all vegetation, windows, and siding to remove any remaining chemical residue.
While a successful diy soft wash roof cleaning project can be rewarding, it demands precision and a strong focus on safety. If the process seems too complex or risky, our licensed and insured team is ready to help. For a professional, worry-free result that protects your investment, contact PBC Pressure Cleaning today.
When to Call a Professional: The Limits of DIY
While taking on a home improvement project can be rewarding, a diy soft wash roof cleaning is not a task to be taken lightly. It involves working at heights with chemical solutions, a combination that carries significant risk. Recognizing the limits of a DIY approach isn’t a failure-it’s a smart decision to protect yourself and your home. Hiring a professional is an investment in superior results, unmatched safety, and complete peace of mind.
The Professional Equipment Advantage
The equipment used by professionals is fundamentally different from what’s available to the average homeowner. Our specialized soft wash systems are designed to deliver a precise, high-volume, low-pressure stream of cleaning solution. This allows for a faster, more thorough, and perfectly even application that eliminates the risk of stripes or missed spots. More importantly, this professional-grade equipment often allows our technicians to clean your entire roof safely from a ladder or the ground, minimizing time spent on a potentially slick and dangerous surface.
Expertise, Insurance, and Guaranteed Results
Every roof is different, and a one-size-fits-all approach can cause irreversible damage. Our experienced technicians understand the specific needs of asphalt shingles, barrel tile, metal, and other common roofing materials in Palm Beach County. Beyond expertise, a professional company protects you. We carry comprehensive liability and workers’ compensation insurance, so you are never financially responsible for accidents. Reputable professionals also guarantee their work, ensuring the job is done right the first time.
Is Your Roof Too Steep or Complex?
Safety should always be your number one priority. Before you attempt a diy soft wash roof cleaning, ask yourself if your property has any of these high-risk features:
- A second-story or multi-level roof
- A steep pitch that is difficult to stand on
- Complex architecture with multiple dormers, valleys, or skylights
If you have any doubts about your ability to complete the job safely, it is always better to call a professional. If your project feels too big, get a free, no-obligation quote from our experts. We have the training and equipment to handle the most challenging roofs, protecting your home’s value and curb appeal without putting you at risk.
Protect Your Investment: The Smart Choice for a Clean Roof
Tackling a diy soft wash roof cleaning project can be a rewarding way to restore your home’s curb appeal. As we’ve covered, success hinges on two critical factors: using the correct low-pressure technique to avoid damaging your shingles and prioritizing your personal safety above all else. A thorough, cautious approach is essential for any homeowner attempting this task.
Once you’ve restored your home’s curb appeal with a clean roof, you might consider other high-impact projects to protect your investment. Inside the home, for example, updating the kitchen can make a huge difference. While some homeowners tackle this themselves, professional services for tasks like Cabinet refinishing Denver offer a way to achieve a flawless, durable finish that revitalizes the entire space.
For homeowners looking for inspiration on interior projects, cabinetrefinishing.info is a great resource for seeing how professional cabinet refinishing can revitalize a kitchen, regardless of your location.
However, it is equally important to recognize when a project is beyond your scope or comfort level. For steep roofs, stubborn stains, or simply to ensure a flawless result, the safest and most effective solution is to trust an experienced professional. PBC Pressure Cleaning offers a meticulous, professional alternative. With 43+ years of experience in Palm Beach County, we are fully licensed and insured for your protection and use only manufacturer-approved soft wash methods to deliver outstanding results without risk.
Protect your biggest investment. Get a free, professional roof cleaning estimate today!
Frequently Asked Questions About Roof Cleaning
How often should you soft wash a roof in Florida?
In Florida’s humid climate, algae and mildew grow aggressively. We recommend a professional soft wash roof cleaning every 2 to 3 years to prevent permanent staining and protect your shingles. This regular maintenance is a vital, affordable service that protects your home’s curb appeal and extends the lifespan of your roof. Neglecting it can lead to the premature decay of roofing materials, resulting in much more expensive repairs or replacement down the line.
Can I use a regular pressure washer on a low setting for my roof?
We strongly advise against using a pressure washer on your roof, even on its lowest setting. The high-pressure stream, regardless of the setting, can easily dislodge the protective granules on asphalt shingles. This action accelerates wear, can void your roof’s warranty, and leads to leaks. The only method recommended by roofing manufacturers is a professional no-pressure soft wash, which relies on cleaning solutions, not force, to achieve a thorough and safe clean.
Will soft washing damage my asphalt shingles?
When performed correctly by a trained and insured professional, soft washing is the safest and most effective method for cleaning asphalt shingles. This technique uses specialized, biodegradable cleaning agents applied with very low pressure-similar to a garden hose. This process eliminates algae, moss, and lichens without the abrasive force that causes damage, preserving the integrity and longevity of your roof and protecting your significant investment.
What is the best time of day or year to clean a roof?
The ideal conditions for cleaning a roof are on an overcast day with minimal wind and moderate temperatures. Hot, direct sunlight can cause the cleaning solution to evaporate too quickly, reducing its effectiveness. Likewise, rain can wash the solution away before it has time to work. In Florida, the fall, winter, and spring months typically offer the most suitable weather for achieving an outstanding and lasting result from your roof cleaning service.
How long does it take for the black streaks to disappear after cleaning?
You will notice a dramatic improvement immediately after the service. However, the black streaks, caused by an algae called Gloeocapsa magma, are killed on contact and may take a few weeks to disappear completely. As rain naturally rinses your roof, the dead organic matter will wash away, revealing a clean and bright surface. For those attempting a diy soft wash roof cleaning, patience is essential as the full, pristine results will emerge over time.
Is it safe to use household bleach instead of pool shock?
Using household bleach is not a safe or effective substitute for a professional cleaning solution. While both contain sodium hypochlorite, household bleach is a much weaker concentration and contains additives that can damage your roof and landscaping. A proper diy soft wash roof cleaning requires specific ratios and surfactants that professionals are trained to handle. Using the wrong chemicals can lead to poor results, property damage, and serious safety hazards.
Recent Comments